Well, you have got a server (most probably linux) which you want to run your tasks on it. How should you do that and What technologies you should adopt?
Windows Users
This tutorial is written with bash (or zsh) in mind. So, If you are a mac or linux user, your default shell would be enough and you can go ahead with the rest of tutorial.
However, Windows users need to follow this tutorial to install WSL and then Ubuntu to get a good bash. After that you would install Windows Terminal and you are good to follow this tutorial.
Note: Some people use putty to connect to their linux box. I do not like it and I do not recommend it. That’s very old school.
SSH
First of all, you know that you should connect to server via SSH. Simplest command would be:
ssh username@serverAddress
But you might want to forward a port to your system to use jupyter (or something). For that we use:
ssh -L 1914:localhost:1914 pourmand@ServerAddress
1914 is just a dummy number for port. Just select something that your server hasn’t used (to see used ports use netstat -nltp).
After that you will need to enter your password for the user pourmand in the server.
Connecting Without Password
You may want the server to know your computer i.e. it does not ask for password every time you want to connect to it.
First, create an ssh key on your machine:
ssh-keygen -t ed25519 -C "your_email@example.com"
Second, you should add that ssh key to your ssh agent:
eval "$(ssh-agent -s)"
ssh-add ~/.ssh/id_ed25519 # change this filename if anything else
Third, you should add your public key to your server, this way the server will know you!
ssh-copy-id -i ~/.ssh/id_ed25519.pub username@serverip
You are done for this part. The server would not ask for your password ever again.
If you want to know more deeply about how and why these commands work, I suggest that you read this and this .
Connecting with Only Server Name
In addition, you can also define your ssh servers in a file called config. This way you can forget the long command I told you at the beginning and connect to the server just by typing:
ssh my_server
For that, open ~/.ssh/config file and write the following configuration:
HOST <<your_desired_host_name>>
	HOSTNAME <<hostname_ip>>
	USER <<your_username>>
	LOCALFORWARD 1914 localhost:1914
You can also set tmux to open automatically by adding the following lines (Reference) :
    RequestTTY yes
    RemoteCommand tmux new -A -s <<your_tmux_session_name>>
Normally, I create two ssh hosts with different names. First one connects normally to the server and the second one directly connects to a tmux session. An Example would be:
HOST company
    HOSTNAME 21.23.18.21
    USER pourmand
    LOCALFORWARD 6006 localhost:6006

HOST company_a
    HOSTNAME 21.23.18.21
    USER pourmand
    RequestTTY yes
    RemoteCommand tmux new -A -s yolo
    LOCALFORWARD 6006 localhost:6006
Tmux
Then you can run your commands on the server, e.g.:
python train.py ...
This is especially good for commands that do not take long time to run. If you have a model that need to be trained for days or even longer, you can not use this. That’s because the moment you close your ssh, all your normal processes would die. So, you will need to use a terminal multiplexer like tmux or screen to handle this problem. Both of them are free and open source and both have easy commands to achieve your needs. You can read full pros and cons here. I use tmux because it supports tabs and easily works with mouse!
Here is a simple tmux session I have created. Note that the session has 6 open tabs. Each of them may do something different.

If you install tmux, out of the box, it won’t look like this. You have to install Oh-my-tmux to make it look pretty. It is pretty easy to install. Just copy these lines and you’re set.
cd
git clone https://github.com/gpakosz/.tmux.git
ln -s -f .tmux/.tmux.conf
cp .tmux/.tmux.conf.local .
tmux source-file ~/.tmux.conf
Tmux CheatSheet
My Cheatsheet for tmux is very simple.
First, I go to tmux using ssh config (which I’ve mentioned previously) or tmux a.
- Activate mouse:
Ctrl+b, M - Create New tab:
Ctrl+b, C - Go to tab:
Ctrl+b, TabNumber - Close tab:
Ctrl+b, X - Detach from session (not close):
Ctrl+b, d - Show All Windows and Tabs:
Ctrl + b, w
This set of commands work pretty okay in my case. Note that you don’t have to remember every possible command available as some of them are accessible with right click on tab (this will be activated with Ctrl+B, M.
Bash, Zsh
Also, if you are using bash, I recommend installing Oh-my-bash and if you are working with zsh, I recommend installing Oh-my-zsh. Actually, we live in the terminal. It shouldn’t look like 80’s anymore. It should look pretty.
Miniconda
Then, you want to install python packages in your environment. But hold on. You can not and should not install them system-wide. This is because multiple projects would require different versions of packages. They may even require different python versions other than preinstalled ones. We need a solution to handle all of them.
Miniconda in my opinion is a very good solution to all of these problems. You can install it using this guide. Once installed, you basically need these commands.
# create a new env
conda create -n venv

# create a new env with specified python version - it is better to always specify python version
conda create -n venv python=3.8

# to activate the env
conda activate venv

conda remove -n venv --all # to remove an enviroment
Now for package installation, you can use both conda install and pip install. Some people say that you shouldn’t use both of them because it may cause problems. I just tend to use conda for creating and activating environment. Then, installing everything else with pip and that works just fine.
Htop
I can’t think anyone not using this tool. It shows you all processes and their memory usuage and what not.

You can also use btop as an alternative.
Nvidia-htop
You can see GPU information using nvidia-smi. But most of the time, it doesn’t tell you all the information you need at once. You want to undestand who is using GPU or how much time GPU is being used and what not. You can see all you need using nvidia-htop. For installation, it is indeed very easy.
pip install nvidia-htop

# then run
nvidia-htop.py
Usually, I use this command most of the time. So, I have a created an alias for it.
echo "alias nv='nvidia-htop.py'" >> ~/.profile

# use this if you do not already have .profile in your .bashrc and .zshrc
# this is very common
echo "source ~/.profile" >> ~/.bashrc
echo "source ~/.profile" >> ~/.zshrc

nvidia-htoponly shows the current status of GPU. It may change in a few seconds. To monitor GPU status regularly usewatch nvidia-htop.py. This way you don’t have to constantly typenvidia-htopover and over again.
NVITop
This one is very similar with nvidia-htop but it shows more!

Installation is also very easy:
pip install nvitop

# then run
nvitop
NVIDIA Docker
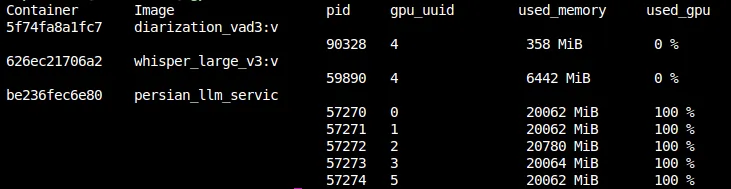
If you use your GPUs inside Docker containers, you can not see which container is eating up your GPU by previous commands.
In this scenario, you should use NvidiaDockerStats and it will show you something like this:
Thanks for reading this far.
Good Luck!