Here I want to guide you toward setting a Jekyll website with al-folio template. This is the template I am using for my website and I love it. I have also made some contributions to make it more usable (specially on docker side).
You do not need to install Jekyll, Docker, Ruby or even clone the repo in order to build and publish a website. You can do it all online and not even bother installing any of them.
Initial Setup
Step 1
For this tutorial, I use my a GitHub organization called al-folio. You should replace all with yours!
First, you have to clone this repository as al-folio.github.io (if you have already clone, just rename it to what I’ve said). Make sure to check only master branch when forking as you do not need other branches.
Then Go to Actions Tab and Enable GitHub Actions.
 Then you need to change
 url into al-folio.github.io and change baseurl into nothing! Just like this:
url: https://al-folio.github.io # the base hostname & protocol for your site
baseurl: # the subpath of your site, e.g. /blog/
Wait for some time until Github Actions finish. You can go to Actions tab and see its progress. Here, we only need Deploy Action to pass. Other actions are not important for now.
Wait some time as it may last up to 5 minutes.
Now, you should have gh-pages branch (deploy action will create it). Go to main page of your repository and check it.
Step 2
Now, go to Repository Settings > Pages.
Choose gh-pages branch and root directory just like me.

Now, Github actions will try to build Page Build and Deployment Action. If it is successful your website should be up and running in 10 minutes.
Why 10 minutes?
After performing all the required actions, the github-pages bot comes into play. Its primary function is to fetch the newly generated website and publish it to the web. However, in some cases, there might be a delay before your changes become visible to others.
Debug!
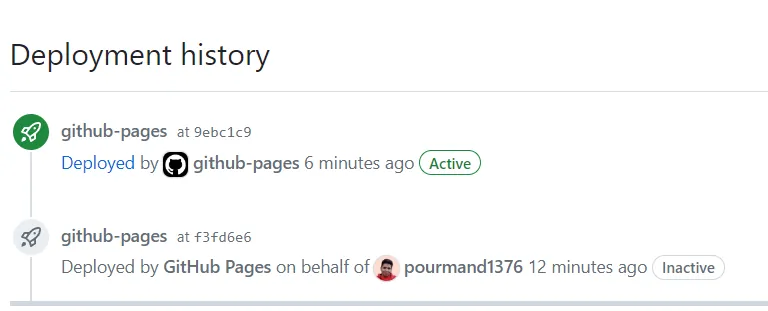
You can check status of github-pages using Environments Section of your github repository. For example, here it says that 9ebc1c9 commit was deployed successfully by github pages. You can check this commit to the latest commit in gh-pages branch.
 You can also see from
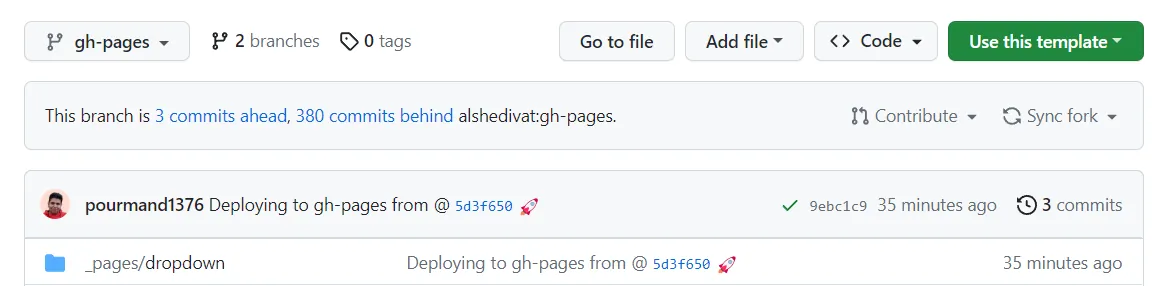
 gh-pages branch that 9ebc1c9 is the last commit. It says that this was generated from 5d3f650 commit from master branch. This can become handy if you have problem and you do not know where is the source of the problem.
If you have problems, make sure that both of your Github Actions are successful. Make sure branch is set to
gh-pagesand also check your website url and baseurl. These are some most common problems people have inJekyllwebsites.
Host on Netlify
You can also easily host this repository on Netlify. Just connect your Github account to netlify. Then select jekyll and you are done. No special configuration is necessary.
Summarize
To summerize the blog, two steps occur when publishing the website:
- First,
DeployAction deploys yourmasterbranch togh-pages. It generates raw html and css. No jekyll here. - Second, Page Build and Deployment Action makes your
gh-pagesbranch ready for publish. But It doesn’t really publish it untilgh-pages botdecides so!
if you want to make more changes, stay with me.
Tune the website Locally
Now, you have your website up and running. It is configured so that whenever you commit to a specific branch, your server (Github or Netlify or whatever) will go and build a fresh website for your use.
However, it is hard to change it locally as you have to wait for some time until your website is build. I recommend that you also install your website locally to review your changes on the fly.
To do that, first clone your fork repository:
git clone git@github.com:<your-username>/<your-repo-name>.git
cd <your-repo-name>
Then use docker compose to see your website:
docker compose up
This will serve your website on localhost:8080. You can go ahead and change your website.
Also, as one of the maintainers of al-folio, I highly recommend using it the docker way. Otherwise, you would have to install ruby and then jekyll and then lots of gem packages. After that you would deal with imagemagic and also jupyter dependecies. That’s a lot of headache. You don’t want to deal with that and more importantly, why would you care?
This is why I took a lot of time to learn docker and then make a dockerfile for al-folio. It is used by a lot of people and normally they have no problem at all.
After viewing your website, you should be able to make changes to website.
I think it is highly intuitive. You start with _config.yaml. You put your name and footer and header and lots of information about yourself in that file.
Then you would go on _pages folder. There you could easily change your about page which is the main website page and also you would see information about other pages.
Some explanation about the folders:
_pagesfolder is actually the root folder that you should take a look at._newsfolder is for adding news to your website. It can show latest news on your achievements.postsfolder is for your blog._projectsfolder is used by_pages/project.mdto generate your projects description.
I think by looking at sample website, you could easily change it all according to your needs and more explanation is not necessary.