There are lots of tutorials on the internet on how to install a GPU driver on Linux. However, I end up searching again every time I want to install a GPU drivers and I get frustrated when there are multiple ways of doing the same thing and I don’t know which one is the best.
Also, there are some things I’ve learned which I’d like to share it.
I’ve tested this on 3090 GPU and Ubuntu 22.04. Yours may vary a little but the procedure it the same.
Before Installation
First, Install build-essentials if you don’t have it:
sudo apt install build-essential
(Optional) Then, sometimes you have to update gcc to the latest version (default is 11). Otherwise, you may get errors like this one:
unrecognized command-line option -ftrivial-auto-var-init=zero
In order to update GCC compiler, you just need to run these two commands (Reference):
sudo apt install --reinstall gcc-12
sudo ln -s -f /usr/bin/gcc-12 /usr/bin/gcc
You can check the installation using gcc --version:
gcc (Ubuntu 12.3.0-1ubuntu1~22.04) 12.3.0
Copyright (C) 2022 Free Software Foundation, Inc.
You should also install these two packages in case you don’t have them:
sudo apt install pkg-config libglvnd-dev
In case you don’t install you would get this warning when installing the driver (Reference):
WARNING: Unable to determine the path to install the libglvnd EGL vendor library config files. Check that you have pkg-config and the libglvnd development libraries installed, or specify a path with --glvnd-egl-config-path.
I would also install vulkan package to remove the warning which says:
WARNING: This NVIDIA driver package includes Vulkan components, but no Vulkan ICD loader was detected on this system. The NVIDIA Vulkan ICD will not function without the loader. Most distributions package the Vulkan loader; try installing the "vulkan-loader", "vulkan-icd-loader", or "libvulkan1" package.
The command to install vulkan is (Reference):
sudo apt install libvulkan1
Downloading and installing the driver
You should now download the NVIDIA driver from here. In my experience, normally the latest and greatest version of NVIDIA would be found there.
There are also some ways to install NVIDIA drivers using package managers like apt. But personally, I find this way better and more reliable. Also, some drivers have more up-to-date versions on Official NVIDIA site.
For example, at the time of writing this article, NVIDIA driver version 550 is not available on apt. But, it is easily downloadable via NVIDIA Official website.
To see your GPU information use (Reference):
sudo lshw -C display
Then, you will get an output like this:
  *-display
       description: VGA compatible controller
       product: GA102 [GeForce RTX 3090]
       vendor: NVIDIA Corporation
       physical id: 0
       bus info: pci@0000:04:00.0
       version: a1
       width: 64 bits
       clock: 33MHz
or
lspci | grep -i nvidia

It shows that I am using RTX 3090. Then, I would choose the operating system as linux 64-bit and download type as production branch. It would show something like this page.
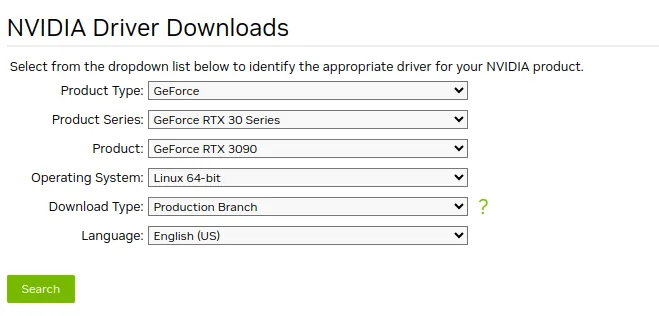
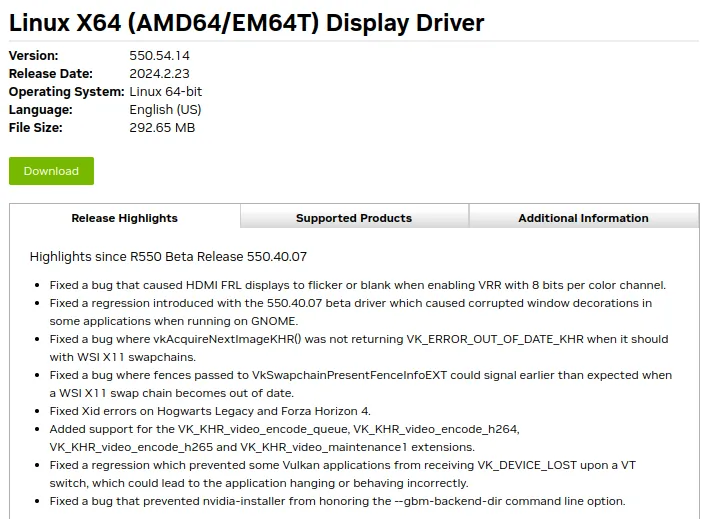
Then you download a .run file. Change the permission and run the file as root:
chmod +x NVIDIA-Linux-x86_64-550.54.14.run
sudo ./NVIDIA-Linux-x86_64-550.54.14.run
Note that you can start downloading in your browser, and then copy the link into VM machine that you have and wget link to download it inside VM.
This should normally work and do the job for you. I would say yes on everything it would say afterwards.
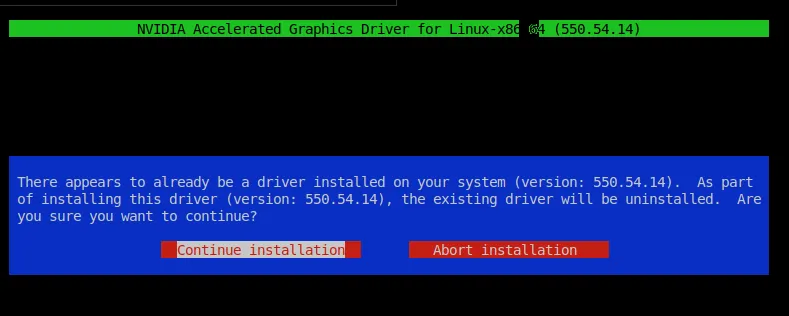
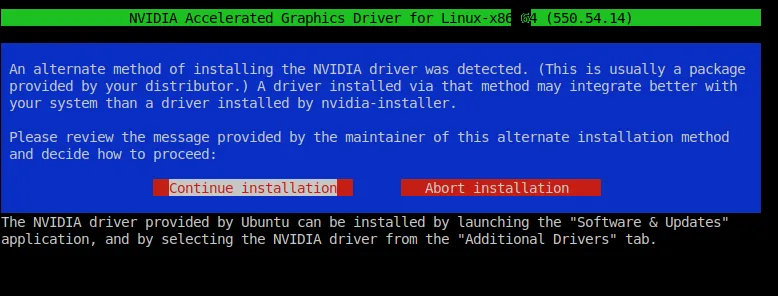


 Make sure to hit yes on this screen (default is no) - Otherwise, you won’t have your GPU driver ready-to-use after restarting your linux machine.


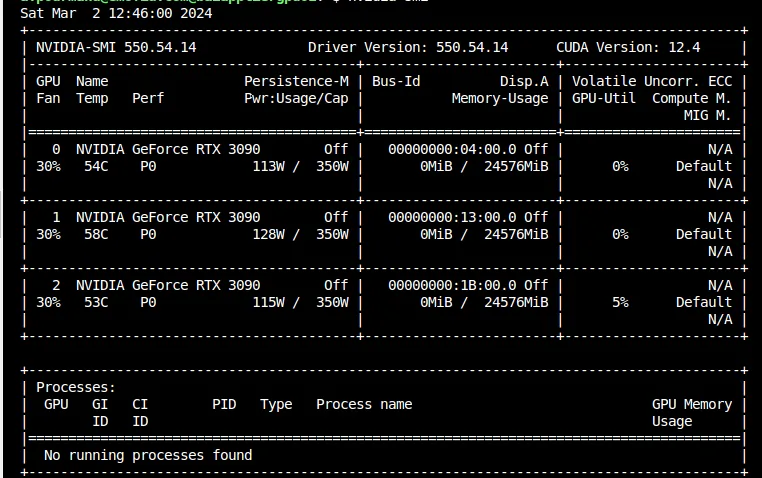
If successful, you should see something like this when running nvidia-smi:
Blacklist Nouveau (when using VMWare ESXI)
Sometimes, you may be working on a virtual machine that is hosted on VMware ESXi. In that case, you may get errors like this after using nvidia-smi:
no-devices-were-found
To solve it, you should also do the following (Reference).
mkdir -p /etc/modprobe.d/
echo 'blacklist nouveau' | sudo tee /etc/modprobe.d/blacklist-nvidia-nouveau.conf
echo 'options nouveau modeset=0' | sudo tee -a /etc/modprobe.d/blacklist-nvidia-nouveau.conf
echo 'options nvidia NVreg_OpenRmEnableUnsupportedGpus=1' | sudo tee /etc/modprobe.d/nvidia.conf
Then update the kernel init using:
sudo update-initramfs -u
and reboot the server:
sudo reboot
After that you should install your driver using:
sudo ./NVIDIA-Linux-x86_64-550.54.14.run -m=kernel-open
Note that -m=kernel-open is important. Otherwise, it wouldn’t work.
Reboot the server afterwards and you are good to go.
Debugging
Debugging NVIDIA installation is a hard task. Here’s how to make it easier.
In case you have problem during installation, two commands help:
less /var/log/nvidia-installer.log
NVIDIA installer won’t show any detail in case there is an error. You should use the log file to see the issues.
sudo nvidia-bug-report.sh
less nvidia-bug-report.log.gz
Also, dmesg would help (make sure to run it after nvidia-smi to see more information on why it is having problem):
sudo dmesg
Installing CUDA Toolkit
After installing GPU, you might need to install CUDA on the server. Make sure to read this tutorial and go along with it.
NVIDIA CUDA Installation Guide for Linux
However, personally, I wouldn’t install that since I use Docker. I normally use docker base images which have CUDA inside them. But if you want to run code on bare metal, you can install CUDA.
NVIDIA says: you do not need to install the CUDA Toolkit on the host system, but the NVIDIA driver needs to be installed. GitHub - NVIDIA/nvidia-container-toolkit: Build and run containers leveraging NVIDIA GPUs
Add GPU Support For Docker
First, you have to install docker using this guide (in case you don’t have it already).
Then, I would use this tutorial to give GPU access to docker daemon.
In short, first add NVIDIA repositories to apt:
curl -fsSL https://nvidia.github.io/libnvidia-container/gpgkey | sudo gpg --dearmor -o /usr/share/keyrings/nvidia-container-toolkit-keyring.gpg \
  && curl -s -L https://nvidia.github.io/libnvidia-container/stable/deb/nvidia-container-toolkit.list | \
    sed 's#deb https://#deb [signed-by=/usr/share/keyrings/nvidia-container-toolkit-keyring.gpg] https://#g' | \
    sudo tee /etc/apt/sources.list.d/nvidia-container-toolkit.list
Then install nvidia-container-toolkit:
sudo apt-get update
sudo apt-get install -y nvidia-container-toolkit
After that, you need to update daemon.json using:
sudo nvidia-ctk runtime configure --runtime=docker
sudo systemctl restart docker
cat /etc/docker/daemon.json
Output:
{
    "runtimes": {
        "nvidia": {
            "args": [],
            "path": "nvidia-container-runtime"
        }
    }
You should now be able to run:
docker run --gpus all nvidia/cuda:11.7.1-cudnn8-devel-ubuntu22.04 nvidia-smi
The output should be the same as running nvidia-smi on bare-metal (outside docker).
Note that you don’t need to do this on Azure VM Servers. There are pre-build images which have NVIDIA driver installed and you can also use either HPC images or DSVM images from the marketplace.
References
- Ubuntu 22.04 default GCC version does not match version that built latest default kernel - Ask Ubuntu
- Nvidia-smi “No devices were found” - VMWare ESXI Ubuntu Server 20.04.03 with RTX3070 - Graphics / Linux / Linux - NVIDIA Developer Forums
- NVIDIA Driver Downloads
- How to Use GPUs from a Docker Container | Saturn Cloud Blog
- NVIDIA Container Toolkit Installation Guide